I have a problem.

Quick Fix, Recipes, Side Dishes, Vegetarian

{avocado fries with cilantro lime sauce}

The problem being that I love avocado. But, here’s the thing, and we have to get this out of the way before we start chatting, avocados are not a health food. Don’t try to sell me on that. They are pure saturated fat. They are butter with a couple vitamins. Eating them straight does not indicate you’re a health nut. It tells me that you are exactly like me, addicted to delicious things.

Now that we’ve got that out of the way and you can finally start admitting to yourself you’re one step away from eating a stick of butter, let’s discuss how we can make these even worse for our thighs/better for our taste buds.

Let’s fry the little suckers. 


1 ripe avocado

1 egg

1 cup panko or breadcrumbs

Vegetable or olive oil 

¼ cup sour cream

1 teaspoon lime juice

1 tablespoon cilantro leaves

Salt and pepper to taste

Peel the avocado. Cut your avocado into strips approximately ¼ inch thick and set aside. Crack your egg into a bowl and slightly scramble with a fork until the egg is a homogenous mixture of white and yolk. Pour your breading out onto a plate next to your egg to create a little dredging station. One at a time, place your avocado slices into the egg, coating both sides, and then into the breadcrumbs. Finish coating all of the slices in this manner before heating up the oil as you won’t want to leave oil unattended as it heats up.
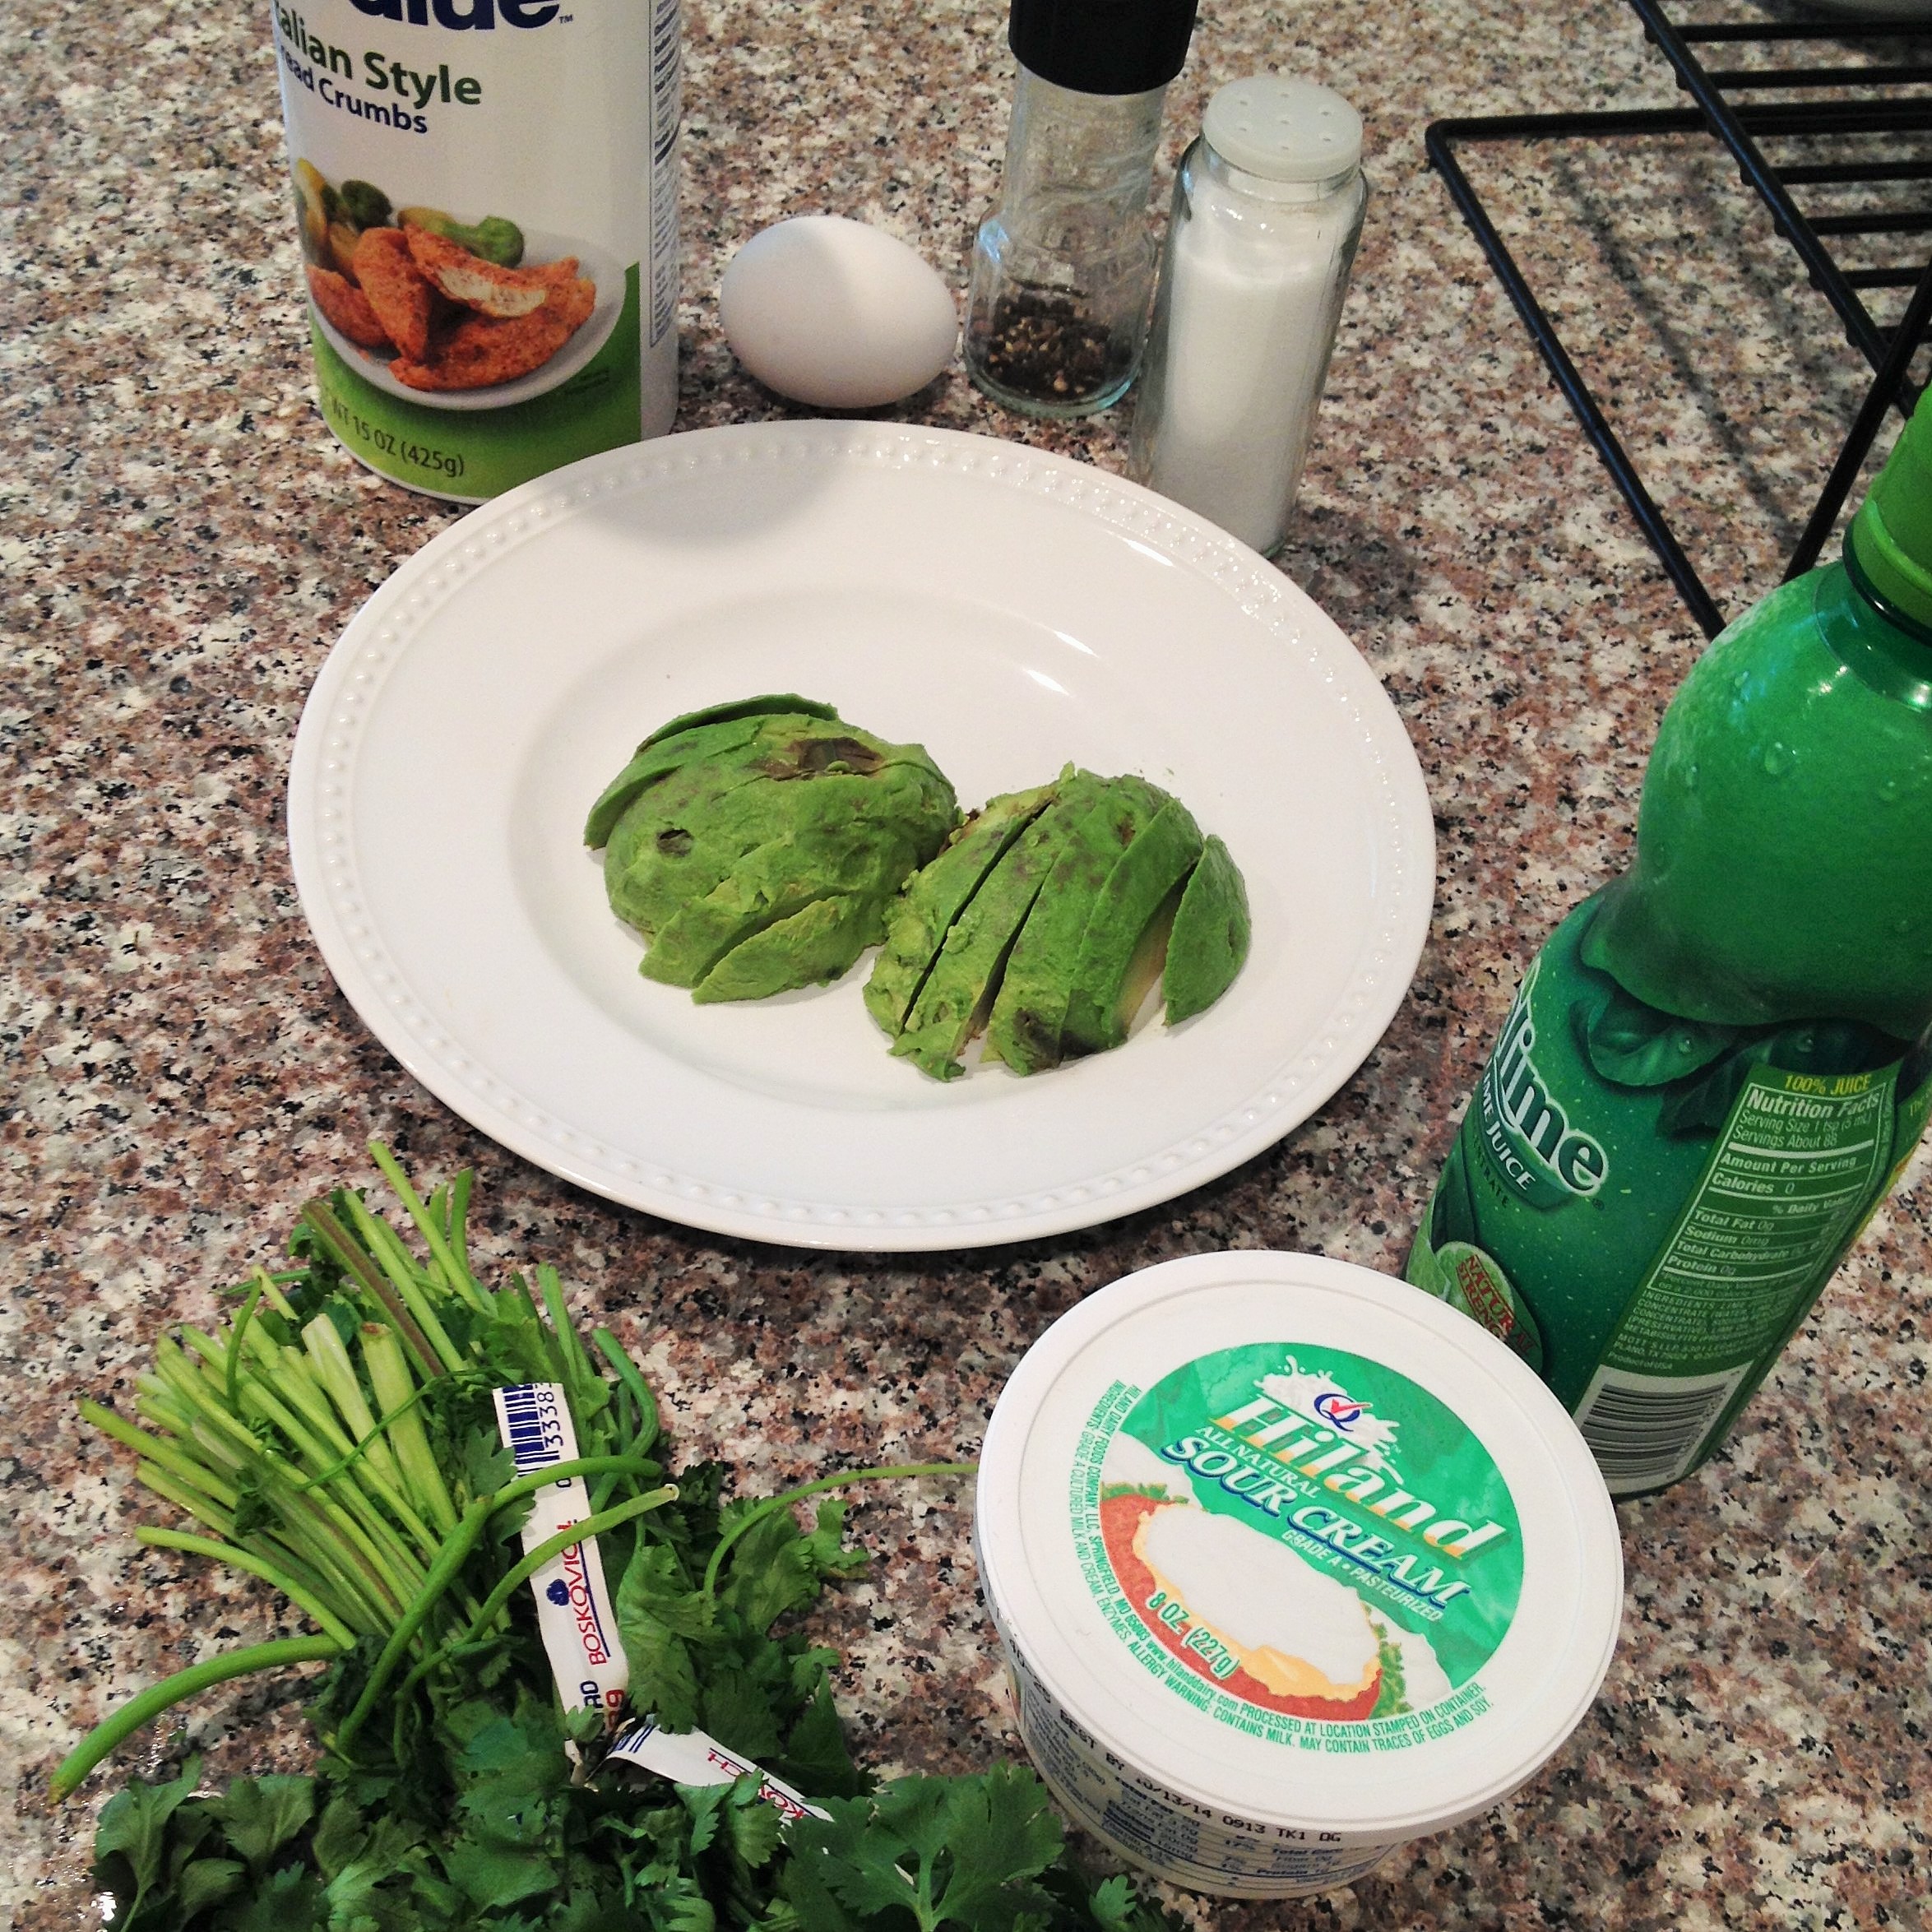
avocado  fries ingredients

*the cast

dredging station (2)

*egg wash

dredged avocado

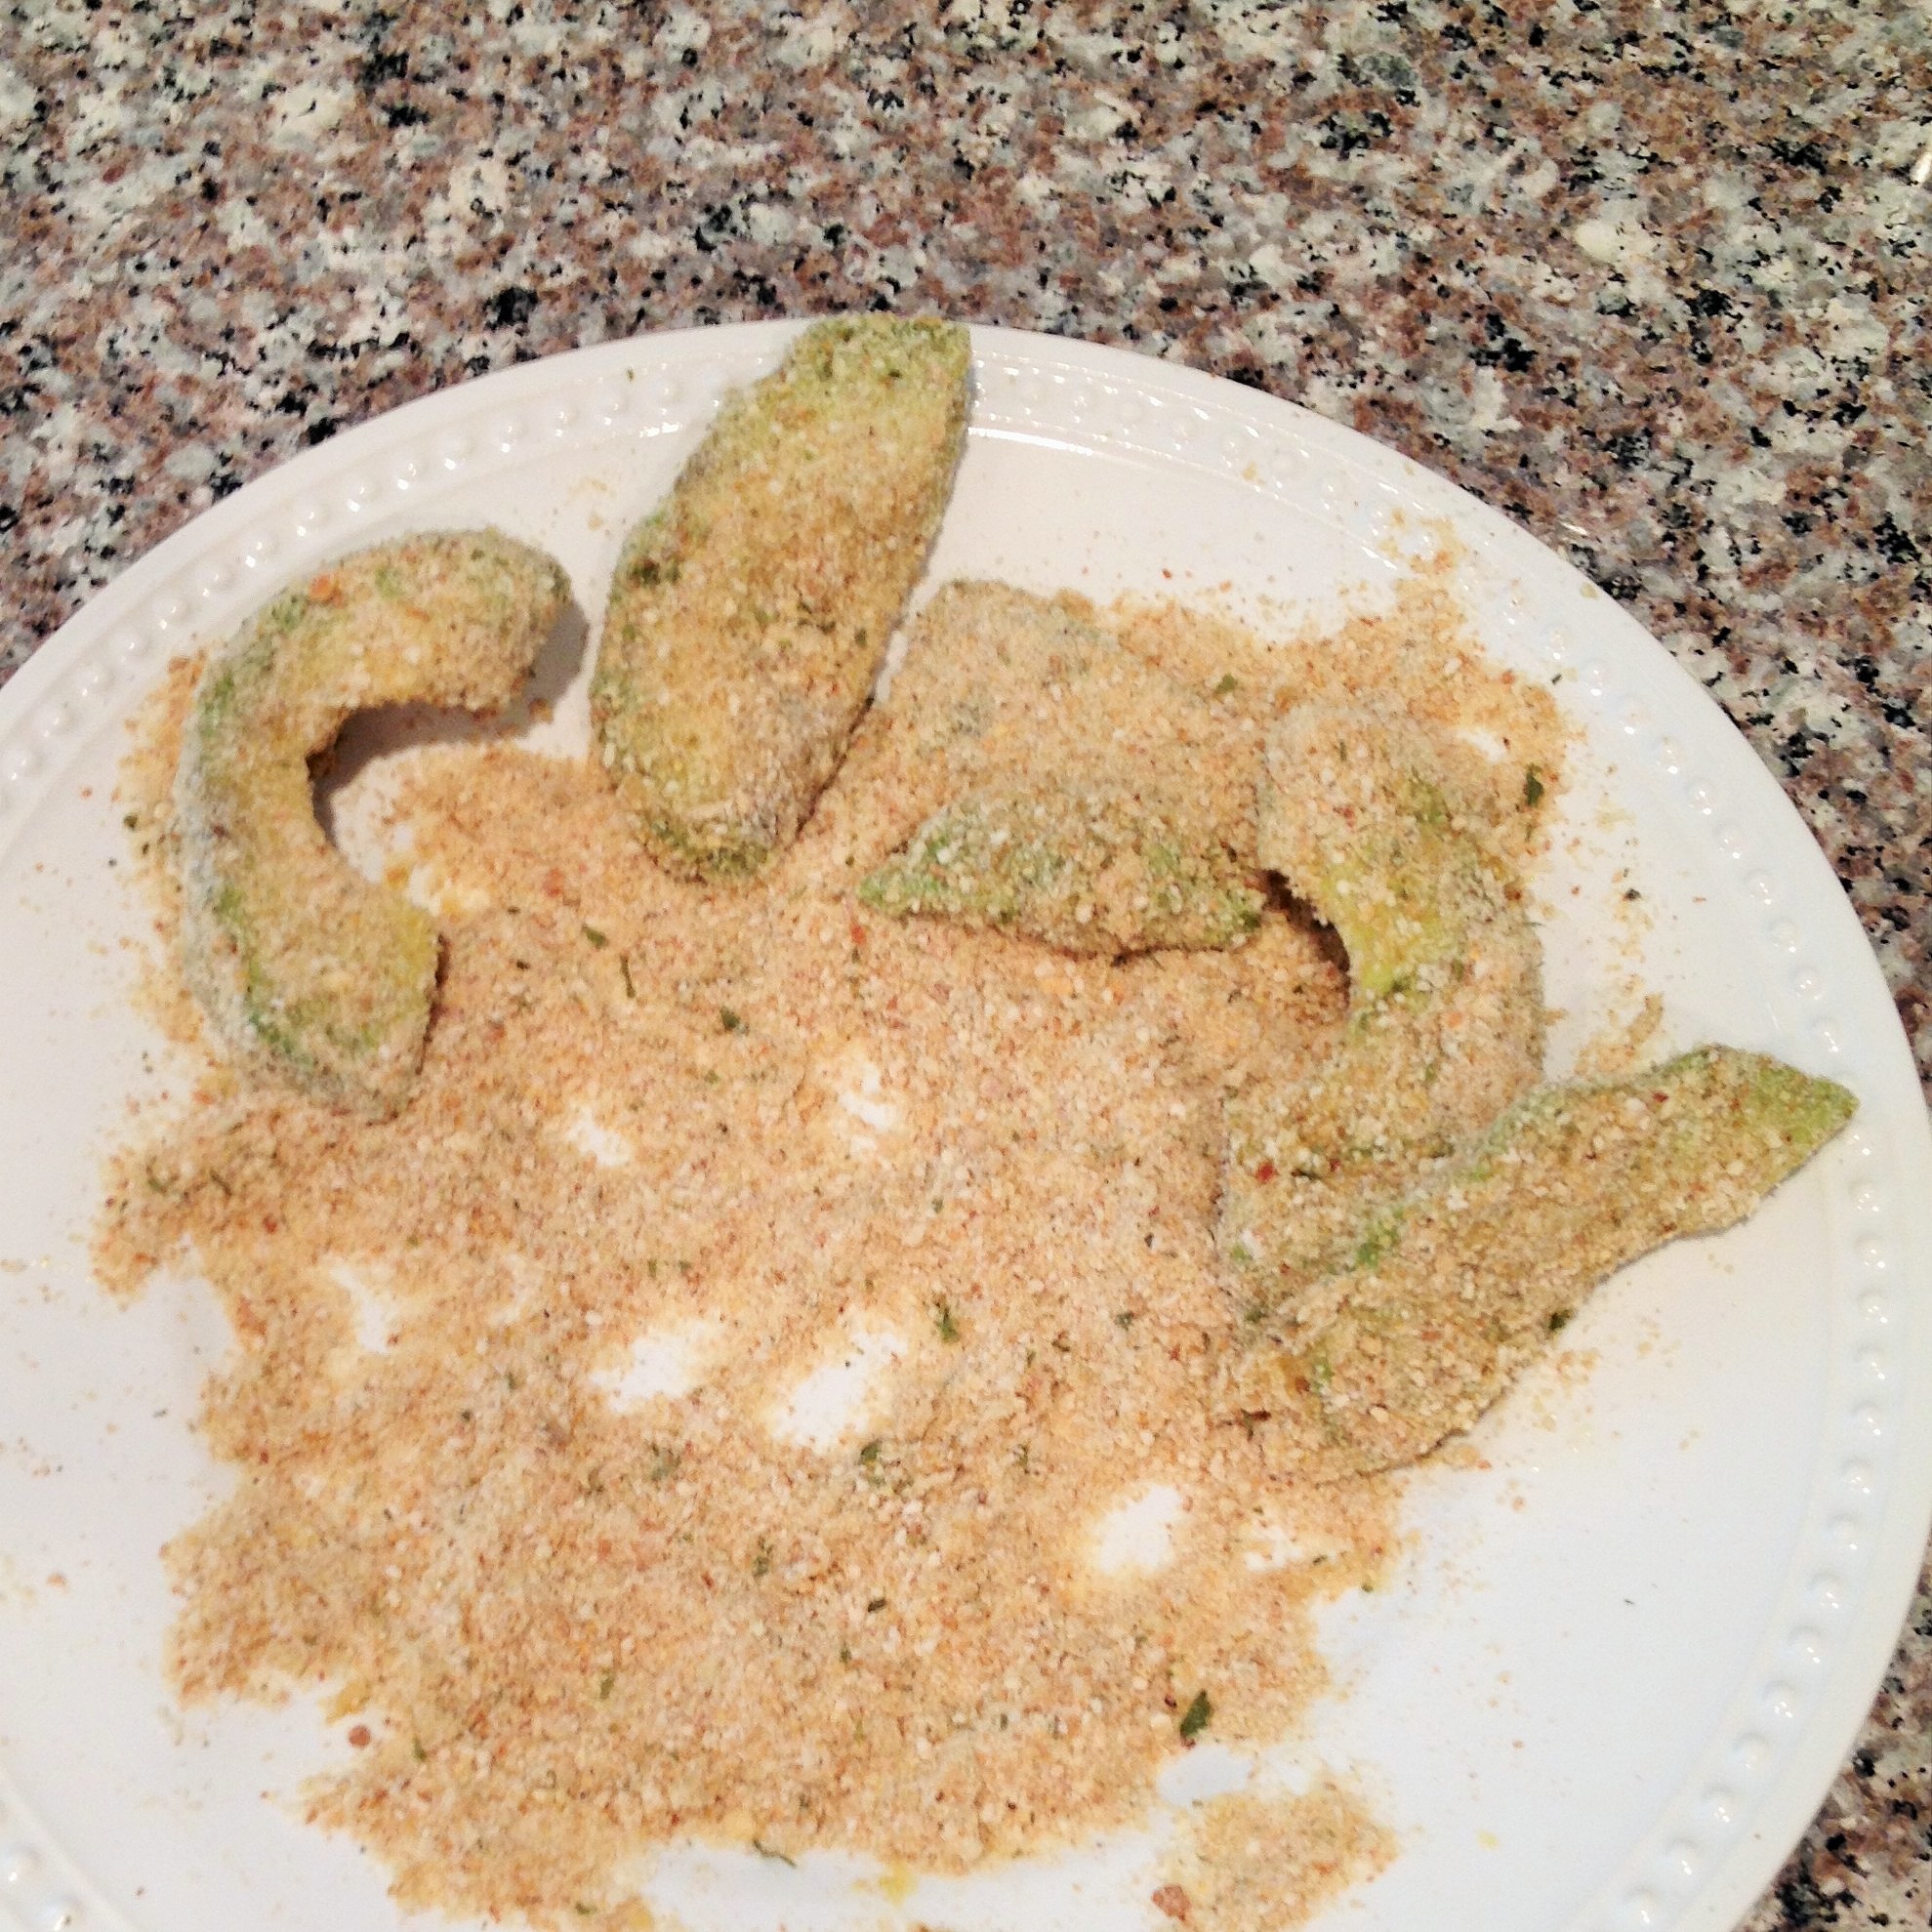
*dredging is such a fun word

Pour enough oil into a small non-stick skillet to coat the bottom. We don’t really want to deep fry these. Heat the oil on medium until a tiny bit of breadcrumb sizzles when it hits the oil. Gently place the dredged avocado slices in the oil one at a time so that they don’t splatter too much. Don’t crowd the pan. Cooking these is much easier if they aren’t packed in like sardines. This took a couple batches of frying for me to get one avocado done. Fry the slices till golden brown and flip to cook the other side. This goes very quickly and I find that these burn easily, so don’t make my mistake and walk away. Once the slices are done, take them out of the oil and place them on a paper towel lined plate for draining. Go ahead and salt and pepper them as each batch is removed so that the salt sticks to the oil that’s still coating them.

cooking avocado

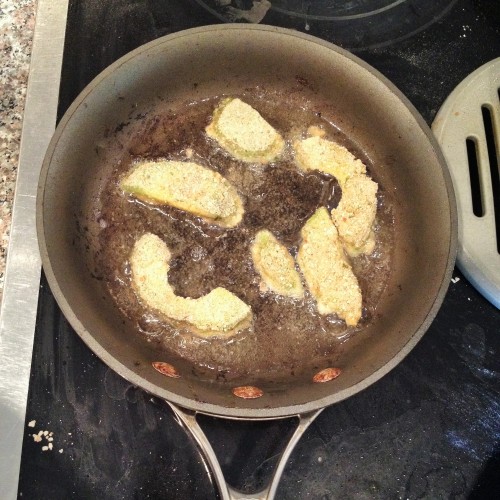
*sorry for the splatter

Once the slices are finished or before you even start cooking (not me because I am incapable of planning ahead), you can either mix all of your sauce ingredients together by hand or put them in a food processor and pulse until the cilantro is well incorporated. The sauce ingredients and amounts are up for debate as I love a ton of lime and you may not. Just play with the flavors. And if you hate cilantro, there is no substitute and I don’t understand you. Although my favorite chef is a cilantro hater (Ina Garten/Barefoot Contessa) and they say your preference for or against cilantro is a genetic thing, I don’t buy it you genetic mutant.

eating avocado (2)

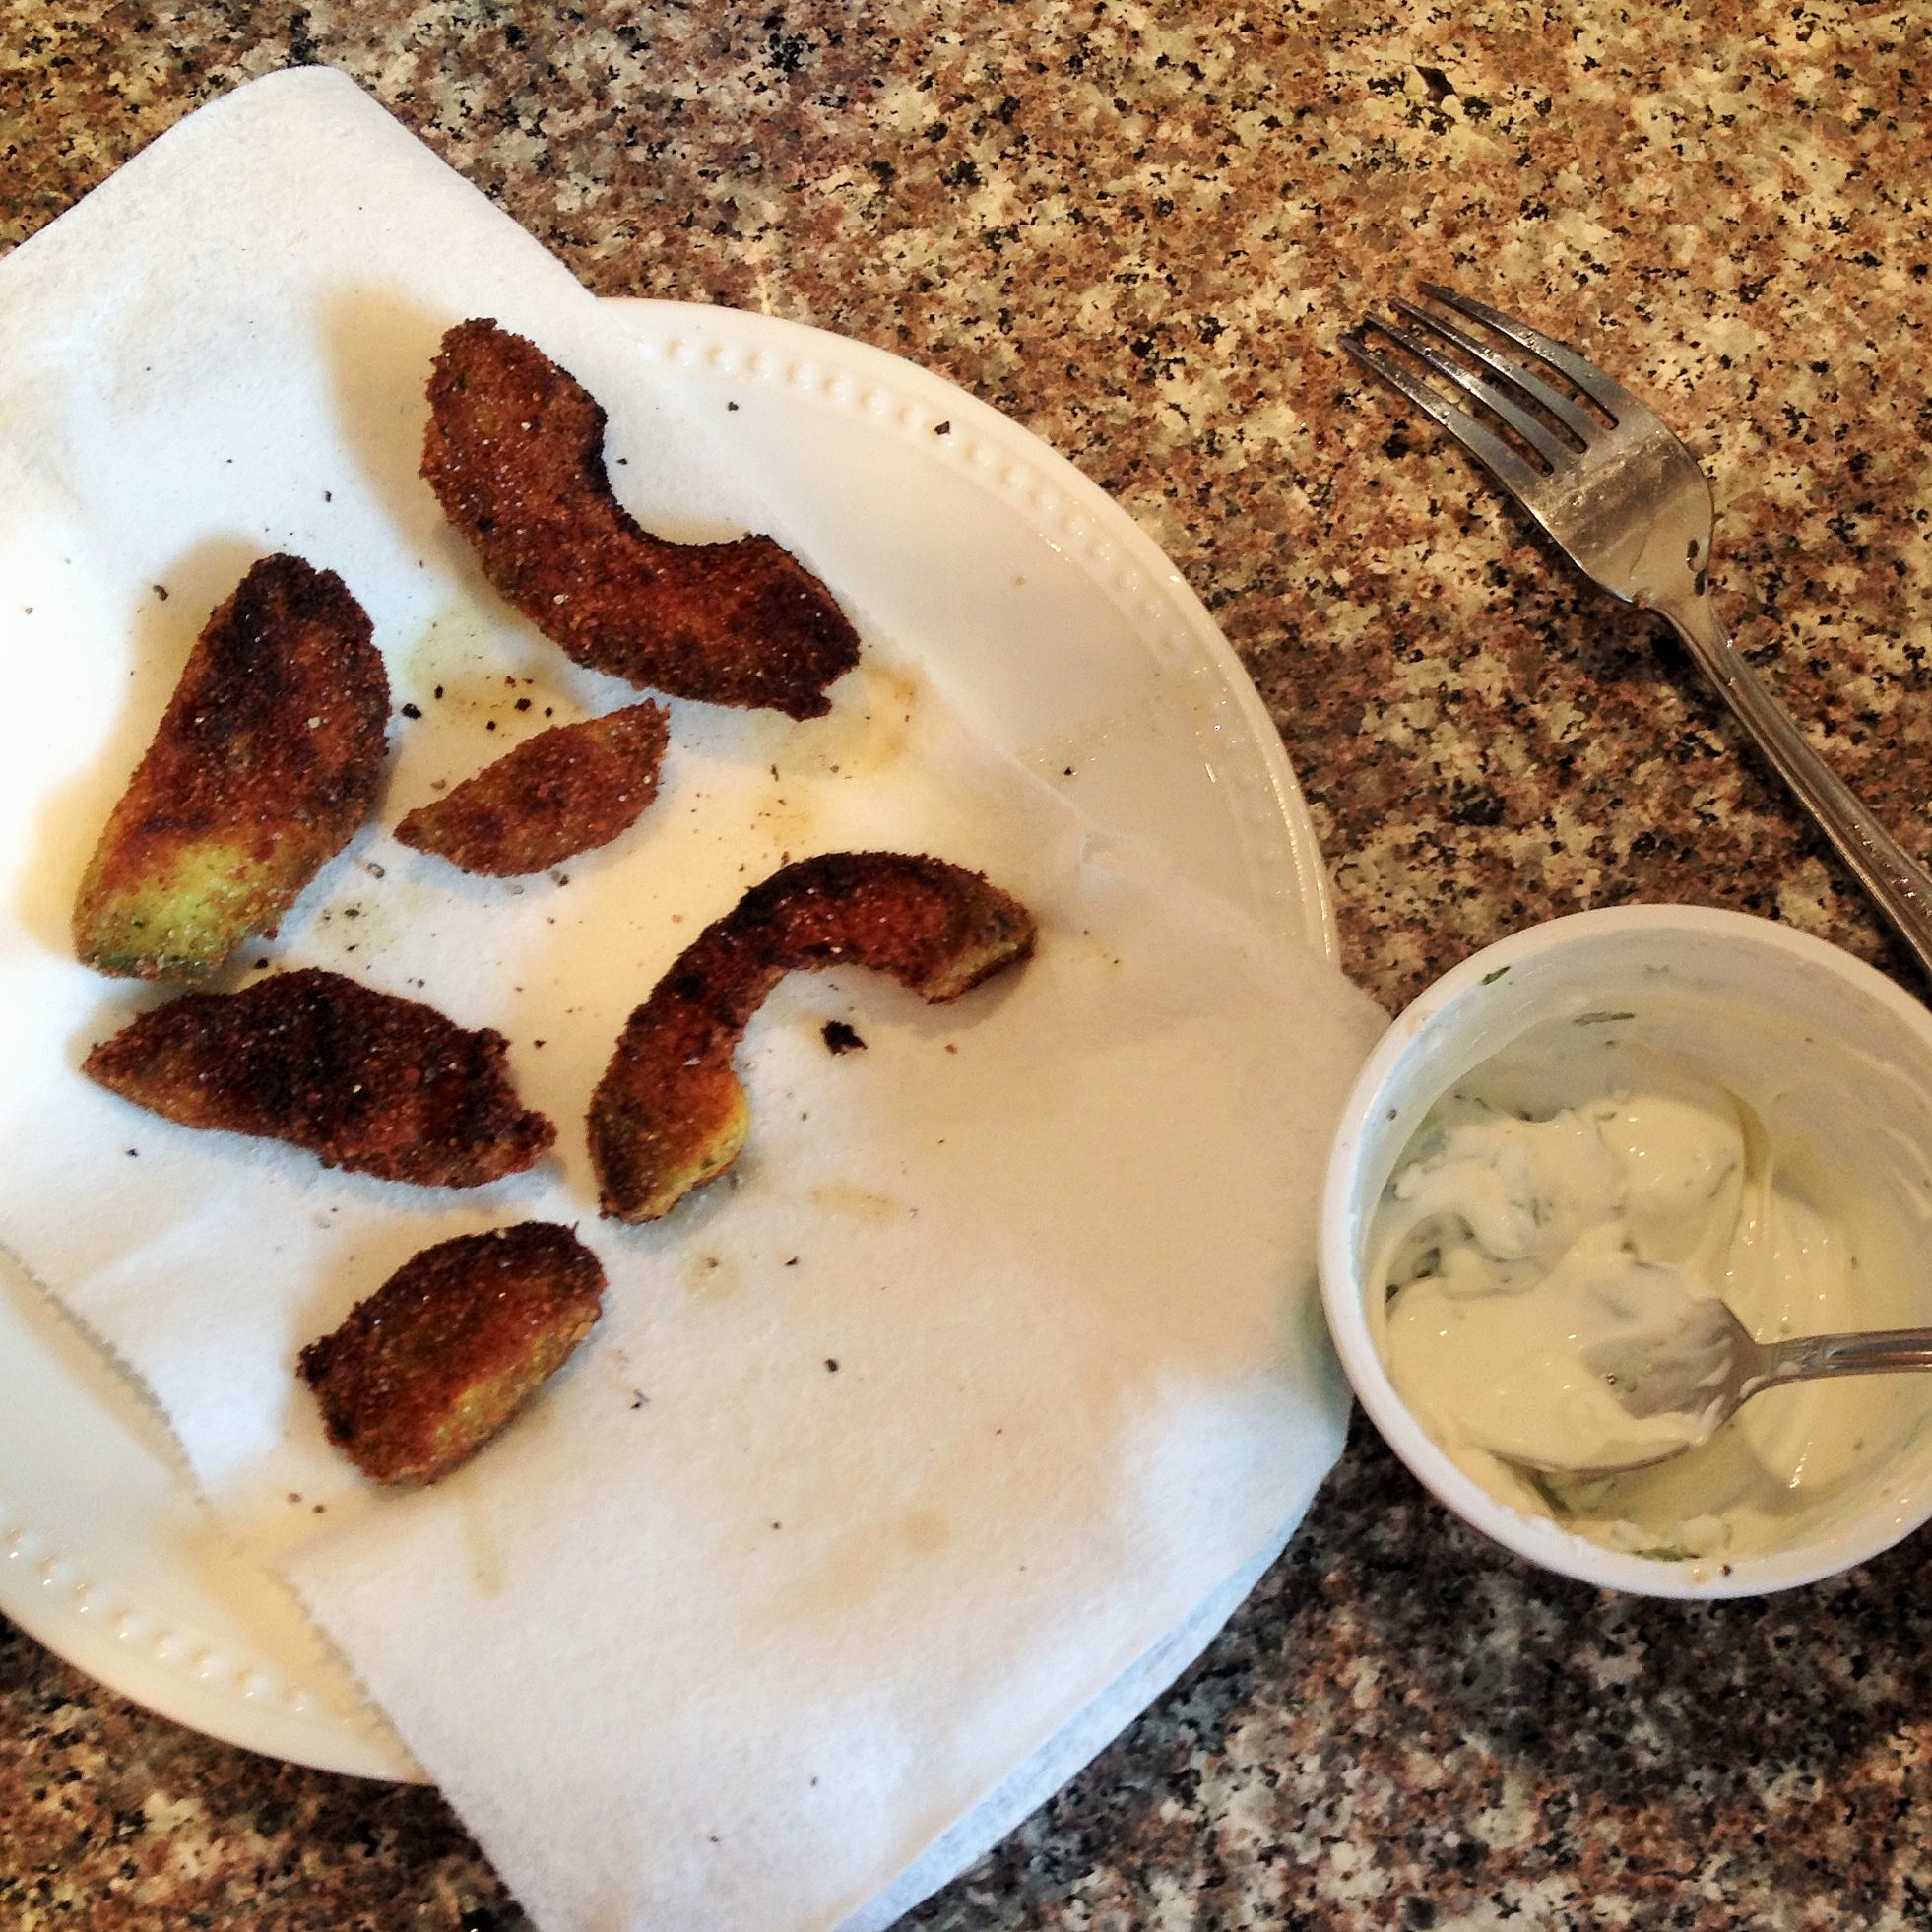
*I didn’t even bother sitting down to eat these

click to download the printable recipe

I thought I hated coconut

Desserts, Quick Fix, Recipes

{coconut macaroons}

photo 4

You know the old adage, your tastes change every 7 years? I completely back that statement, but, it’s not the most common phrase in our house. I believe instead that we’ve more likely been exposed to an undesirable preparation of the food we think we “hate.” Let me give you some backstory.
My husband and I were friends long before we started dating, and the one thing that stood out to a food obsessed girl like myself was the fact that he never ate anything but meat and potatoes. Oh sure, he’d eat a salad, but he refused any cooked fruits or vegetables. And he wouldn’t touch any sort of casserole, fish, or most any food with a sauce. It was limiting to say the least. I’ll give him full credit here and say that from the moment we started dating, he agreed to try what I made. I didn’t expect him to like it all, or even eat more than a bite of most of it. Surprisingly, he and I both found that he didn’t actually dislike many foods (we both still have a vendetta against mushrooms), but he disliked the original preparation. I think we can all relate to that. Your grandmother stuffs canned asparagus down your throat for years, so when someone grills fresh asparagus for you, you’re understandably apprehensive. So how on earth does this relate to coconut? Well, my husband has now surpassed me in terms of having an adventurous appetite. And this irks me to my core.
I grew up with a mother who was obsessed with all things coconut. But when I say coconut, I should really say “coconut.” What she loved was that imitation coconut flavor. Things that tasted like sunscreen smells. Everything was coconut. So I grew up thinking I hated coconut, when come to find out, this isn’t true at all. Once I realized my husband was beating me at the trying old things again game, I began trying incorporating real coconut into things. I started out with homemade granola, then became obsessed with yogurt with coconut, walnuts, and dark chocolate. And now I realize I freaking love coconut. So when the idea came to me to make some macaroons, I was on it.
The original recipe had to be modified quite a bit as I rarely have sweetened coconut in my pantry. I prefer to keep unsweetened as it can be used in sweet and savory dishes. If you’re using sweetened here, omit the milk and reduce the sugar to a ½ cup to account for the extra moisture and sweetness of the sweetened coconut. 

Total time: 30 minutes
Prep: 5 minutes
Cook: 15-20 minutes

3 cups unsweetened coconut flakes
¼ cup milk
4 large egg whites
¾ cup sugar
1 teaspoon vanilla extract
¼ teaspoon salt
1 cup milk chocolate chips (semi or dark would be nice here too, depending on preference)

Preheat the oven to 350°F. Line a cookie sheet with parchment paper. Set aside.
Place your coconut in a large bowl with the milk and stir to combine. You’re using this milk to moisten the coconut, so make sure it’s thoroughly incorporated. Let this mixture continue to rest while you do the next step.
Combine the egg whites, sugar, vanilla, and salt in a mixing bowl. Whisk until the whites and sugar are completely combined and the mixture is frothy.
Combine the coconut and egg white mixture. Pour the coconut over the egg white mixture and stir until the coconut is evenly moistened.
Use either your hands or a small ice cream scoop to make ½ to 1 inch balls of the mixture. My personal preference is to drain some of the liquid off of the macaroon before placing on the parchment. Place them about an inch apart.
Bake the macaroons until golden, 15-20 minutes. Let the macaroons cool on the baking sheet for 5 minutes, then transfer to a wire rack to cool completely.
While the macaroons are cooling, place 1 cup of chocolate chips in a microwave proof bowl. Microwave for 15 seconds at a time, stirring in between until the chips are mostly melted. They will continue to melt once you remove them from the microwave and keep stirring. This took me 45 seconds of microwave time total. If you’re worried about blush (the white hue chocolate can get when exposed to extreme temperatures) then melt your chocolate in a double boiler over simmering water until melted. You can use this melted chocolate to drizzle over your macaroons, or do like I do and just plop it on there.

click to download the printable recipe

Pasta salad for people who don’t like pasta salad

Chicken, Entrées, Leftovers, Quick Fix, Recipes

image
You know the stuff I’m talking about. Bought from a grocery store, sopping wet with mayonnaise, making you feel like there’s a serving of vegetables in it because of the occasional slice of olive or 1×1 centimeter piece of red bell pepper. No one is fooled by your fancy tri-colored pasta, Salad!

Now that that’s off my chest, let’s move forward with what we do like. How about something with flavor? That gets better the longer it sits in the fridge. Something that has some fiber and isn’t loaded with fat. Yeah, that sounds like a pretty nice summer meal.

Total time: 1.5 hours
Prep: 30 minutes
Cook: 15 minutes for the pasta, assuming that you’re using pre-cooked chicken

2 cooked chicken breasts, cubed (approximately 2-3 cups, depending on how much meat you prefer)
4 cups dry whole wheat rotini pasta
1/3 red onion, diced
2 medium tomatoes, diced
4 ounces crumbled feta
2 ounces shredded parmesan
2 tablespoons basil pesto
2 tablespoons olive oil
½ cup Italian dressing
½ teaspoon garlic powder
Small handful of fresh basil leaves, chopped
Salt and pepper to taste

I often use my Italian slow-cooker chicken for this recipe, but you can use any cubed or shredded chicken you like.

Start by cooking your pasta to al dente in a large stockpot full of well salted water. Drain the cooked pasta and rinse well in cold water. While the pasta is cooking, cube your chicken and cut up your vegetables. This recipe would be fantastic with black olives, chopped bell pepper, or even broccoli added in at this point. I just didn’t have these items available. Use your imagination here.

Toss your well drained pasta, vegetables, chicken, and cheeses together in a large bowl. Pour your Italian dressing, olive oil, and pesto over the whole thing and stir well. This is where I’m going to warn you that this recipe needs a lot of salt due to the pasta and the chicken. This recipe has the tendency to be very bland if you don’t add the right amount of salt and pepper. Just add to your tastes.

Add the basil last so that it doesn’t get too beat down with all the stirring. Let this all marinate in the fridge for an hour or two before eating so that the flavors meld.

Epitome of lazy

Chicken, Entrées, Quick Fix, Recipes, Slow-Cooker

I had to post this recipe because this chicken works well in the pasta salad recipe I’m about to write, otherwise, I never would let you all in on my deepest, darkest secrets.

Know this, I will take every shortcut imaginable, as long as the flavor doesn’t suffer. I often keep meat frozen, since I buy it in bulk and on sale. So when I decide to use it, it’s never convenient. I don’t like to thaw things in the microwave because once you use this method, you find out that it partially cooks the food and leaves you having to finish cooking it so it doesn’t stay in the temperature danger zone. (Little known fact, thawing meats in the fridge or under running water allows you to change your mind and put the meat back in the freezer if you become tired of waiting. Microwave thawing does not allow this privilege). Often I try to make myself feel better about the time spent waiting for my meat to thaw by placing the frozen meat in a marinade. This discovery happened around the same time I started haphazardly throwing frozen meat in my slow-cooker. I’m sure you can see where this is going…

I often marinate my chicken slated for grilling in pre-made Italian dressing. One day I’m sure I had grand plans to fire up the grill, but then reality struck about what time I would get off work or the weather wasn’t cooperating and I just decided to throw it all in. Probably one of my more enlightened moments.

Total time: 4-6 hours
Prep: 5 minutes
Cook: 4-6 hours

4-6 frozen chicken breasts
2 tablespoons basil pesto
½ bottle Italian dressing

Get out the slow-cooker. Plug in the slow-cooker. Place ingredients in the slow-cooker while trying to look like you’re doing something important so that your husband will not be able to downplay your role in dinner later.

Cook for 4/6/8 hours on low. I just leave it till I come home from work and the chicken’s internal temperature is 165° F. Sometimes I flip it over at lunch. The time it takes really is more related to the thickness of your chicken, whether it’s frozen or thawed, and how many breasts you’re using. A trick I often use if I’m making a dish that doesn’t fill my rather large slow-cooker is to push a piece of foil down onto the food so that the moisture isn’t able to evaporate and dry out the food. The foil shouldn’t touch the food, just make kind of a tent over it.

If you’re not using this chicken in chicken salad or pasta salad, it is great on its own or served with pasta tossed in pesto.
italian chicken
fancy.

“Blog worthy”

Chicken, Entrées, Leftovers, Quick Fix, Recipes, Side Dishes

chicken fried rice
My husband is pretty good at bragging on me, but not enough for me to get a big head, because I’m definitely prone to do that. Knowing this, it may come as a surprise that he literally went on for hours this evening over leftovers… chicken fried rice to be exact. Which was the only choice we had as our fridge was barren. I had spent all day literally doing nothing but preparing for a garage sale and sitting in the yard with coffee and a toddler. I try to act like I have a plan for meals, I really do, but tonight was more the rule than the exception and I just threw it together and thankfully, it really turned out. So much so that the man that has yet to even see my blog deemed the recipe “blog worthy.”

So let’s get down to the nitty gritty, shall we? Still, with the leftover chicken! And because in my mind, fried rice does not equal a meal, I attempted to replicate a spicy edamame dish served at a favorite local sushi place. But we’ll discuss the main dish first.

Total time: (not including cooking the chicken) 40 minutes
Prep: 5-10 minutes depending on how many vegetables you have to chop
Cook: 20 minutes

1 cup dry white rice
2 cups water
1 yellow onion, diced
1 egg
1 cup cooked chicken, diced
Veggies if you like them (carrots, zucchini, peas, celery, corn, water chestnuts would all work here. Anything you can come up with that isn’t too wet.)
4-6 tablespoons butter
1 tablespoon soy sauce
Pepper
Toasted sesame seeds (optional)

Cook rice however suits you best. I personally use a rice cooker because it’s super easy and some people are just prone to screw up rice, my husband being one of them. Once the rice is cooked, I put it in a fine colander and run it under cold water to cool it off. You could also place it in the fridge if you think ahead further than I. But who are we kidding? The main goal here is to have cold rice as it over cooks if you try to fry it while it’s still warm.

While the rice is cooling, place 2 tablespoons of butter in a large skillet and sauté the onion and any additional vegetables you choose over medium-high heat until it gets a bit of color. Add the egg and chicken and cook through. At this point, I add an additional 2 tablespoons of butter to the pan and then the cold rice and soy sauce. You will need to add more butter if the rice is wanting to stick, but depending on the pan, it will vary. Let the rice sit without stirring so that it starts to get color and fry, turn it over with a spatula every couple of minutes. If your rice completely fills the pan and is too thick, it will just continue to steam. In my case, I fry the rice in two batches so that it’s only about a ½ inch thick in the pan and can get a really good crust on it. Add more butter as you need to. Don’t be scared of the butter. Be one with it. You may chant this to yourself if you feel your cardiologist guilt tripping you on your other shoulder.

Once you’re ready to serve it, you can add more soy sauce depending on the level of salt that you prefer. This is also the time when you would add pepper and toasted sesame seeds if you like them! Also please remember that this recipe is well suited to be made with a variety of proteins. This would be great with beef, extra egg, tofu, just veggies, you name it.

Now for the side dish/main source of protein in this meal. The original recipe Spicy edamame.

Total time: 18 minutes
Prep: 8 minutes
Cook: 10 minutes

2 teaspoons kosher salt (less if your edamame is pre-seasoned)
1 teaspoon chili powder
1/4 teaspoon red pepper flakes
1 tablespoon minced garlic
1 tablespoon sesame oil
1/2 teaspoon dried oregano
1 (1-pound) bag frozen edamame, in the pod

Mix the salt, chili powder, garlic, and pepper flakes in a small skillet with the oil over medium heat, stirring until hot and aromatic, about 3 minutes. Remove from the heat and mix in the oregano.

Boil the edamame pods in salted water until tender, about 8 minutes. Drain in a colander and toss the edamame pods with the chili-salt. Serve warm.

This recipe can also be prepared with the steam in a bag frozen edamame you can find at your local supermarket. Just to make your life even easier.

Can’t eat the same thing twice

Chicken, Entrées, Leftovers, Quick Fix, Recipes

Image

Most of the recipes on this site will be scaled down to feed a family of three or four, but there are always exceptions to this rule. Specifically when I’m making basics like whole chickens and roasts that can be turned into many other recipes. I think the hardest task as a cook is to come up with meals on the fly after a long day of work, no pre-planning, and a toddler underfoot. That’s why I’m going to start a category for leftovers.

Our family has an interesting take on this leftover business. We simply cannot stand to keep eating the same thing meal after meal till it’s gone. This may be why our freezer is full of single serve portions of pork roast and even waffles. This “issue” is actually the catalyst for a lot of our favorite recipes’ creations, and it can be yours too if you’re willing to be a little creative and you have a well-stocked kitchen. I will write a post later on what I consider to be my kitchen staples to make pretty much any recipe. However, I must note, please never look at a recipe you’re in the mood to make and write it off because you may not have every ingredient. Ingredients and amounts only really matter when you’re baking something. Everything else is up for debate.

Here’s where this recipe started Chicken and Couscous. Great. I have 20 minutes that my husband is home for lunch and we have a hell of a lot of chicken left over from Chicken in Milk. This will do.

Total time: 20 minutes
Prep: 5 minutes
Cook: 15 minutes

1 cup dry whole wheat couscous
2 cups chicken stock
2 tablespoons butter, divided
1 yellow onion, diced
2 cloves garlic, minced
1 cup cooked chicken, diced
1 lemon, zest and juice
Tandoori powder
Salt and pepper to taste


Get couscous started on the stove by boiling stock. Add dry couscous and follow package directions regarding cooking time. Once fluffed and ready, add 1 tablespoon of butter and the lemon juice and zest.

While the couscous is cooking, sauté diced onion in a skillet in 1 tablespoon of butter over medium-high heat until transparent. Toss chicken in tandoori powder or another Middle Eastern seasoning of choice like turmeric and garam masala. Add garlic and seasoned chicken to cooked onion in the skillet and heat through, being careful not to burn the garlic, but getting a bit of color on the chicken which will add flavor. Toss chicken mixture and couscous together and season with salt and pepper to taste.

Enjoy!